Working with Ionic 4.x and Magento 2.x was problematic for me. So, I decided to write an article about Ionic 4 and Magento 2. Today, I am going to show you, how to connect Ionic with Magento and get products by using REST API.
First, I will fix some configurations to avoid unexpected behaviors then the coding part.
Magento 2 – .htaccess configuration to avoid Cross-Origin Resource Sharing (CORS) errors.
The most important part is when making requests from Ionic to Magento 2, the CORS error should arise if you do not configure properly.
CORS is a W3C standard mechanism that allows communicating and sharing data between different sources or domains. It defines some rules to tell the system in which a browser and server can interact to determine whether it is safe.
To avoid this kind of error in the console please add the following code into your Magento’s root .htaccess file.
RewriteEngine on
RewriteCond %{REQUEST_METHOD} OPTIONS
RewriteRule ^(.*)$ "index.html" [R=200,E=API:1,PT]
<IfModule mod_headers.c>
    SetEnvIf Accept application/json API
    Header always set Access-Control-Allow-Origin "*" env=API
    Header always set Access-Control-Allow-Methods "POST, GET, OPTIONS, DELETE, PUT" env=API
    Header always set Access-Control-Allow-Headers "Access-Control-Allow-Headers, Origin, Accept, X-Requested-With, Content-Type, Access-Control-Request-Method, Access-Control-Request-Headers, Authorization" env=API
</IfModule>
Ionic 4 – Making the product page ready
I assume that you know about Ionic basic. So, I am not describing here how to install, generates pages and other related kinds of stuff.
Here, We will use the Magento REST API to fetch data. Because Magento 2’s REST API is more stable than Magento 1 REST API, availability of more endpoints and easy to use.
We need to import HttpClientModule in our Ionic app to make HTTP request to Magento 2’s API.
src/app/app.module.ts
// ...
import { HttpClientModule } from '@angular/common/http';
// ...
@NgModule({
  // ...
  imports: [
    // ...
    HttpClientModule
  ],
  // ...
})
export class AppModule {}
I generated a products page where I will fetch product data.
There are few authentication methods but I used Token-based authentication system to communicate with Magento.
Basically, I code into src/app/products/products.page.ts mostly. Imported HttpClient to make the HTTP requests. Wrote two methods, getAuthToken for getting token and getProducts for pulling products into Ionic from Magento. To get products I used Magento’s rest/V1/products endpoint and added some filter logics there, like filtering by category id, sorting order, count products, pagination, etc.
src/app/products/products.page.ts
import { Component, OnInit } from '@angular/core';
import { HttpClient } from '@angular/common/http'; // need to import to make http request

@Component({
  selector: 'app-products',
  templateUrl: './products.page.html',
  styleUrls: ['./products.page.scss'],
})
export class ProductsPage implements OnInit {

  public baseUrl = 'http://mage2.local/';
  public apiEndPoint = this.baseUrl + 'rest/V1/products';

  private userName = 'admin'; // add your username
  private userPass = 'pass123'; // add your passwoord
  private adminToken: any;

  public prodItems: Array<{ id: string; sku: string; name: string; image: string; price: string }> = [];

  constructor(
    private http: HttpClient // inject HttpClient
  ) { }

  ngOnInit() {
    this.getAuthToken();
  }

  /**
   * get authorization token from magento2
   */
  getAuthToken() {
    const formData = new FormData();
    formData.append('username', this.userName);
    formData.append('password', this.userPass);

    const adminTokenPoint = this.baseUrl + 'rest/V1/integration/admin/token';
    // make http post request to magento2 api
    this.http.post<any>(adminTokenPoint, formData)
      .subscribe(
        res => {
          this.adminToken = res;
          this.getProducts(res);
        },
        err => {
          console.log(err);
        }
      );
  }

  /**
   * get products from magento2 category
   * @param adminTokenStr
   */
  getProducts(adminTokenStr: string) {
    const adminToken = adminTokenStr;
    const categoryId = 3; // get products from category id 3
    const sortOderType = 'DESC'; // sort order type
    const pageSize = 10; // number of products
    const currentPage = 1; // get products for first page
    const apiEndPoint = `
    ${this.apiEndPoint}?searchCriteria[filterGroups][0][filters][0][field]=category_id&
    searchCriteria[filterGroups][0][filters][0][value]=${categoryId}&
    searchCriteria[filterGroups][0][filters][0][conditionType]=eq&
    searchCriteria[sortOrders][0][field]=created_at&
    searchCriteria[sortOrders][0][direction]=${sortOderType}&
    searchCriteria[pageSize]=${pageSize}&
    searchCriteria[currentPage]=${currentPage}
    `;

    // make http request to magento2's api
    this.http.get<any>(apiEndPoint, {
      headers: {'Content-Type':'application/json', 'Authorization':'Bearer ' + adminToken}
      }).subscribe(
        res => {
          console.log('res');
          console.log(res);
          const prodsArr = res.items;

          prodsArr.forEach((item)=>{
          const imagePath = `${this.baseUrl}pub/media/catalog/product${item.custom_attributes[0].value}`;
          this.prodItems.push({
              id: item.id,
              sku: item.sku,
              name: item.name,
              image: imagePath,
              price: item.price,
            });
          });
        },
        err => {
          console.log(err);
        }
      );
  }

}
I stored all products on prodItems variable in the products.page.js file. So, I iterate that variable in the following page to generate a product listing into Ionic.
src/app/products/products.page.html
<ion-header>
  <ion-toolbar>
    <ion-title>products</ion-title>
  </ion-toolbar>
</ion-header>

<ion-content>
  <ion-grid>
    <ion-row>
      <ion-col size="6" *ngFor="let item of prodItems">
        <div class="item item-{{item.id}}">
          <ion-img src="{{item.image}}"></ion-img>
          <div class="ion-text-center">
            <ion-text>price: {{item.price}}</ion-text>
            <ion-label>{{item.name}}</ion-label>
          </div>
        </div>
      </ion-col>
    </ion-row>
  </ion-grid>
</ion-content>
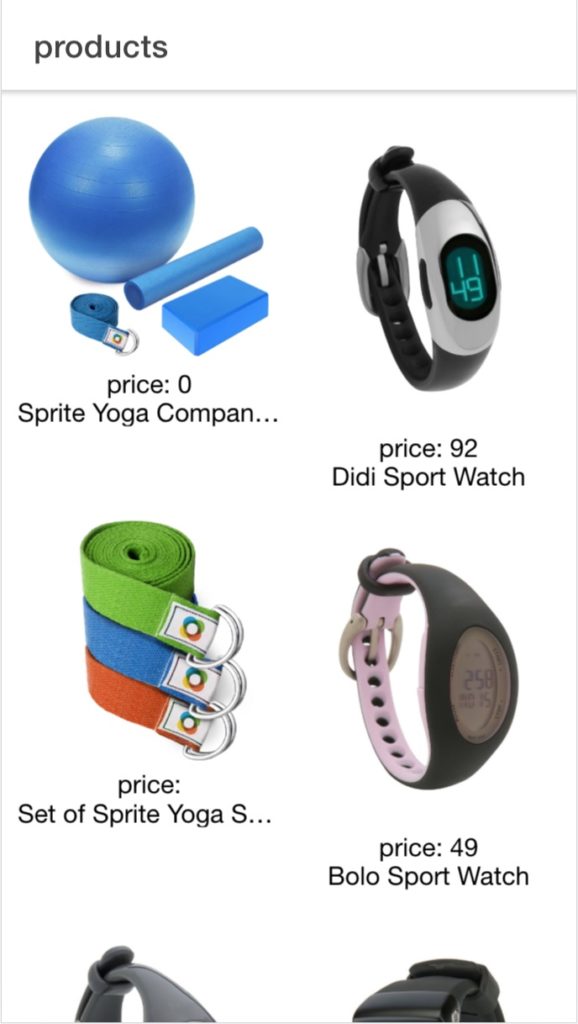
Here we come, this is the final output page into Ionic.

I know It is not a good practice to put all things into one page. Like, I could make separate the token-based auth function to a different place as common service class but I wanted to make it simple and concise.
You may know any different better approaches to accomplish this issue. So, You can share your thought in the comment box below. That’s it for today. Happy Coding!

