Magento 2 – How to get external API value in the Ui component form by using a custom HTML button.

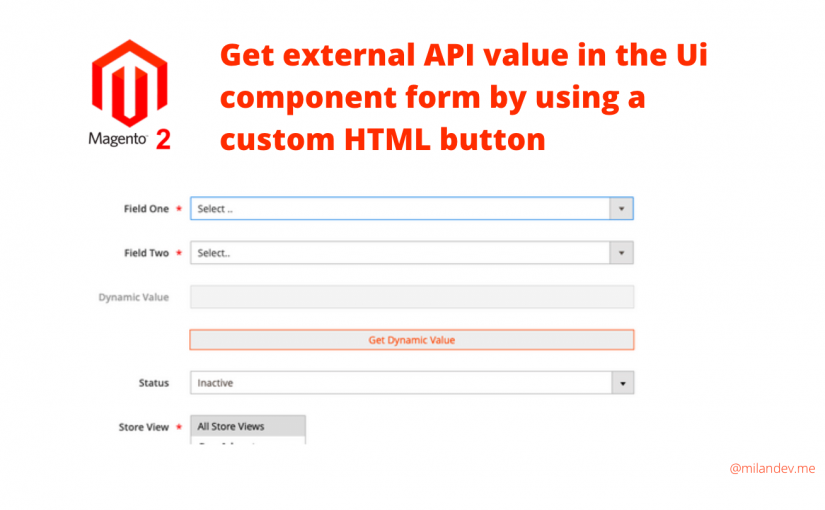
A few days ago I was working on a backend CRUD module. There was a task to get a dynamic value from external API based on the selected values of two fields and update an input field before saving form data.

Adding custom HTML contents on the Ui component form and fetching data from an external source was unknown to me. So, I decided to write a short article about this issue. So, here I am today.

To accomplish this task, I had to add a custom button in my Ui component form and bind a click event on this button. While clicking on the button It hits an ajax request to a controller where I put my API code.

I hope, You have your own custom module already. If you need these kinds of requirements please follow the steps below.

I am using Milandev_Demo as my module name and milandev_demo as backend router name.

1. Add HTML button inside Ui form fieldset

Basically htmlContent is required to add a custom element in the Ui form and one block needs to add there. Please follow the convention and file paths.
app/code/Milandev/Demo/view/adminhtml/ui_component/milandev_demo_demo_form.xml

<!-- ... -->
<htmlContent name="html_content">
    <block name="mc_dynamic_value" class="Magento\Backend\Block\Template" template="Milandev_Demo::get_dynamic_value.phtml"/>
</htmlContent>
<!-- ... -->

This section contains the html button and few javascript to make ajax call to our API controller.
app/code/Milandev/Demo/view/adminhtml/templates/get_dynamic_value.phtml

<a href="javascript:void(0)" 
    id="mc_get_dynamic_value" 
    style="width: 630px; 
        display: block; 
        background: #eee; 
        text-align: center; 
        margin: 0 auto 30px; 
        border: 1px solid #eb5202; 
        color: #eb5202; padding: 4px 0;">Get Dynamic Value</a>

<script>
    require(['jquery'], function($){
        $('#mc_get_dynamic_value').on('click', function(e){
            $("div[data-role='spinner']").show();
            let api_controller_url = window.api_controller_url;
            let field_one = $("select[name='field_one']").val();
            let field_two = $("select[name='field_two']").val();
            $.ajax({
                url : api_controller_url,
                type : 'POST',
                data: {
                    field_one_v: field_one,
                    field_two_v: field_two,
                    format: 'json',
                    form_key: window.FORM_KEY
                },
                dataType:'json',
                success : function(data) {
                    $("div[data-role='spinner']").hide();
                    $("input[name='dynamic_value']").val(data).change();
                },
                error : function(request,error)
                {
                    console.error('Dynamic Value Fetching Error!');
                }
            });
        });
    });
</script>

2. Add a JavaScript block to get controller URL

Here I need to add a JS block where I will define a normal javascript variable that is used in the previous phtml block file above.
app/code/Milandev/Demo/view/adminhtml/layout/milandev_demo_demo_edit.xml

<?xml version="1.0"?>
<page xmlns:xsi="http://www.w3.org/2001/XMLSchema-instance" layout="admin-1column" xsi:noNamespaceSchemaLocation="urn:magento:framework:View/Layout/etc/page_configuration.xsd">
    <body>
        <referenceContainer name="js">
            <block class="Magento\Backend\Block\Template" name="custom_js_backend" template="Milandev_Demo::js.phtml"/>
        </referenceContainer>
        <referenceContainer name="content">
            <uiComponent name="milandev_demo_demo_form"/>
        </referenceContainer>
    </body>
</page>

Create the block file in the following location and add the snippet below.
app/code/Milandev/Demo/view/adminhtml/templates/js.phtml

<script>
    require([
     "prototype"
    ], function () {
        window.api_controller_url = '<?= /** @noEscape */ $block->getUrl('milandev_demo/api');?>';
    });
</script>

3. Create controller (API) file

This file will contact to external API and returns a json value.
app/code/Milandev/Demo/Controller/Adminhtml/Api.php

<?php declare(strict_types=1);
namespace Milandev\Demo\Controller\Adminhtml;

class Api extends \Magento\Backend\App\Action
{
    protected $resultPageFactory;
    protected $jsonHelper;

    /**
     * Constructor
     *
     * @param \Magento\Backend\App\Action\Context  $context
     * @param \Magento\Framework\View\Result\PageFactory $resultPageFactory
     * @param \Magento\Framework\Json\Helper\Data $jsonHelper
     * @param \Psr\Log\LoggerInterface $logger
     */
    public function __construct(
        \Magento\Backend\App\Action\Context $context,
        \Magento\Framework\View\Result\PageFactory $resultPageFactory,
        \Magento\Framework\Json\Helper\Data $jsonHelper,
        \Psr\Log\LoggerInterface $logger
    ) {
        $this->resultPageFactory = $resultPageFactory;
        $this->jsonHelper = $jsonHelper;
        $this->logger = $logger;
        parent::__construct($context);
    }

    /**
     * Execute view action
     *
     * @return \Magento\Framework\Controller\ResultInterface
     */
    public function execute()
    {
        try {
            $params = $this->getRequest()->getParams();
            $fieldOneValue = $params['field_one_v'];
            $fieldTwoValue = $params['field_two_v'];

            // start api calling
            $service_url = 'https://example.com/getlist?oneParam='.$fieldOneValue.'&twoParam='.$fieldTwoValue;
            $handle = curl_init();

            curl_setopt($handle, CURLOPT_HTTPAUTH, CURLAUTH_BASIC);
            curl_setopt($handle, CURLOPT_USERPWD, "user:pass"); // put username and password if required
            curl_setopt($handle, CURLOPT_URL, $service_url);
            curl_setopt($handle, CURLOPT_RETURNTRANSFER, true);
            curl_setopt($handle, CURLOPT_SSL_VERIFYHOST, false);
            curl_setopt($handle, CURLOPT_SSL_VERIFYPEER, false);

            $apiResult = curl_exec($handle);
            $code = curl_getinfo($handle, CURLINFO_HTTP_CODE);
            curl_close($handle);

            $resultObjts = json_decode($apiResult);
            
            $dynamicValue = $resultObjts['dynamic_value'];
            // end api calling
            
            return $this->jsonResponse($dynamicValue);
            
        } catch (\Magento\Framework\Exception\LocalizedException $e) {
            return $this->jsonResponse($e->getMessage());
        } catch (\Exception $e) {
            $this->logger->critical($e);
            return $this->jsonResponse($e->getMessage());
        }
    }

    /**
     * Create json response
     *
     * @return \Magento\Framework\Controller\ResultInterface
     */
    public function jsonResponse($response = '')
    {
        return $this->getResponse()->representJson(
            $this->jsonHelper->jsonEncode($response)
        );
    }
}

This is what I did to make it possible. Please share your thought if you know the other ways to make the same thing happened. Happy Coding!

Magento 2 – How to add extra category description in the product listing page.

Today, I am going to show you how to add an extra bottom description in the category page. This allows for adding a long description text. It is very useful when store owners want to add SEO text or extended description for any category.

By default, Magento 2 has only one description in the above of category page. Which is basically a short description field in the backend. So If you want to add another description please follow the steps below.

1. Create a basic module.

Declar module by creating module.xml and registration.php files. Let’s say the module name is MilanDev_BottomDescription.

In the module.xml file notice the sequence node which holds the dependent module Magento_Catalog for your custom module.
app/code/MilanDev/BottomDescription/etc/module.xml

<?xml version="1.0" ?>
<config xmlns:xsi="http://www.w3.org/2001/XMLSchema-instance" xsi:noNamespaceSchemaLocation="urn:magento:framework:Module/etc/module.xsd">
	<module name="MilanDev_BottomDescription" setup_version="1.0.0">
		<sequence>
			<module name="Magento_Catalog"/>
		</sequence>
	</module>
</config>

app/code/MilanDev/BottomDescription/registration.php

<?php
\Magento\Framework\Component\ComponentRegistrar::register(
    \Magento\Framework\Component\ComponentRegistrar::MODULE,
    'MilanDev_BottomDescription',
    __DIR__
);

2. Create the Bottom Description field in the backend.

This following file will create a bottom_description category attribute in the database.
app/code/MilanDev/BottomDescription/Setup/InstallData.php

<?php
namespace MilanDev\BottomDescription\Setup;

use Magento\Framework\Setup\InstallDataInterface;
use Magento\Framework\Setup\ModuleContextInterface;
use Magento\Framework\Setup\ModuleDataSetupInterface;
use Magento\Eav\Setup\EavSetup;
use Magento\Eav\Setup\EavSetupFactory;
use Magento\Eav\Model\Entity\Attribute\ScopedAttributeInterface;

class InstallData implements InstallDataInterface
{

    private $eavSetupFactory;

    /**
     * Constructor
     *
     * @param \Magento\Eav\Setup\EavSetupFactory $eavSetupFactory
     */
    public function __construct(EavSetupFactory $eavSetupFactory)
    {
        $this->eavSetupFactory = $eavSetupFactory;
    }

    /**
     * {@inheritdoc}
     */
    public function install(
        ModuleDataSetupInterface $setup,
        ModuleContextInterface $context
    ) {
        $eavSetup = $this->eavSetupFactory->create(['setup' => $setup]);

        $eavSetup->addAttribute(
            \Magento\Catalog\Model\Category::ENTITY,
            'bottom_description',
            [
                'type' => 'text',
                'label' => 'Description',
                'input' => 'textarea',
                'required' => false,
                'sort_order' => 4,
                'global' => ScopedAttributeInterface::SCOPE_STORE,
                'wysiwyg_enabled' => true,
                'is_html_allowed_on_front' => true,
                'group' => 'General Information',
            ]
        );
    }
}

This code snippet below will add a visual Bottom Description attribute for the categories in the admin panel, which includes WYSIWYG editor enabled.
app/code/MilanDev/BottomDescription/view/adminhtml/ui_component/category_form.xml

<?xml version="1.0" ?>
<form xmlns:xsi="http://www.w3.org/2001/XMLSchema-instance" xsi:noNamespaceSchemaLocation="urn:magento:module:Magento_Ui:etc/ui_configuration.xsd">
	<fieldset name="content">
		<field name="bottom_description" template="ui/form/field" sortOrder="60" formElement="wysiwyg">
            <argument name="data" xsi:type="array">
                <item name="config" xsi:type="array">
                    <item name="wysiwygConfigData" xsi:type="array">
                        <item name="height" xsi:type="string">100px</item>
                        <item name="add_variables" xsi:type="boolean">false</item>
                        <item name="add_widgets" xsi:type="boolean">false</item>
                        <item name="add_images" xsi:type="boolean">true</item>
                        <item name="add_directives" xsi:type="boolean">true</item>
                    </item>
                    <item name="source" xsi:type="string">category</item>
                </item>
            </argument>
            <settings>
                <label translate="true">Bottom Description</label>
                <dataScope>bottom_description</dataScope>
            </settings>
            <formElements>
                <wysiwyg class="Magento\Catalog\Ui\Component\Category\Form\Element\Wysiwyg">
                    <settings>
                        <rows>8</rows>
                        <wysiwyg>true</wysiwyg>
                    </settings>
                </wysiwyg>
            </formElements>
        </field>
	</fieldset>
</form>

After adding those files above you should see the field below category description.

Bottom Description field in the backend.

3. Make visible in the product listing page.

Here, we will push the texts we added in the backend. First, you need to create a phtml file which contains the attribute text. Then you can put the text to bottom in the category page.
app/code/MilanDev/BottomDescription/view/frontend/templates/product/list/bottom_description.phtml

<?php if ($_bottomDescription = $block->getCurrentCategory()->getBottomDescription()): ?>
    <div class="category-bottom-description">
        <?= /* @escapeNotVerified */ $this->helper('Magento\Catalog\Helper\Output')->categoryAttribute($block->getCurrentCategory(), $_bottomDescription, 'bottom_description') ?>
    </div>
<?php endif; ?>

Inject the text using Magento 2 layout techniques.
app/code/MilanDev/BottomDescription/view/frontend/layout/catalog_category_view.xml

<?xml version="1.0"?>
<page xmlns:xsi="http://www.w3.org/2001/XMLSchema-instance" layout="2columns-left" xsi:noNamespaceSchemaLocation="urn:magento:framework:View/Layout/etc/page_configuration.xsd">
    <body>
        <referenceContainer name="content">
            <block class="Magento\Catalog\Block\Category\View" name="bottom.description" template="MilanDev_BottomDescription::product/list/bottom_description.phtml" after="-"/>
        </referenceContainer>
    </body>
</page>

After doing all the steps above. Enable the module, generate classes and refresh the cache. If everything was well, now you should see something like this.

Bottom Description in the product listing page.

If you have any opinions or query please comment below. Happy Coding.