Today, I am going to show you how to add an extra bottom description in the category page. This allows for adding a long description text. It is very useful when store owners want to add SEO text or extended description for any category.
By default, Magento 2 has only one description in the above of category page. Which is basically a short description field in the backend. So If you want to add another description please follow the steps below.
1. Create a basic module.
Declar module by creating module.xml and registration.php files. Let’s say the module name is MilanDev_BottomDescription.
In the module.xml file notice the sequence node which holds the dependent module Magento_Catalog for your custom module.
app/code/MilanDev/BottomDescription/etc/module.xml
<?xml version="1.0" ?>
<config xmlns:xsi="http://www.w3.org/2001/XMLSchema-instance" xsi:noNamespaceSchemaLocation="urn:magento:framework:Module/etc/module.xsd">
	<module name="MilanDev_BottomDescription" setup_version="1.0.0">
		<sequence>
			<module name="Magento_Catalog"/>
		</sequence>
	</module>
</config>
app/code/MilanDev/BottomDescription/registration.php
<?php
\Magento\Framework\Component\ComponentRegistrar::register(
    \Magento\Framework\Component\ComponentRegistrar::MODULE,
    'MilanDev_BottomDescription',
    __DIR__
);
2. Create the Bottom Description field in the backend.
This following file will create a bottom_description category attribute in the database.
app/code/MilanDev/BottomDescription/Setup/InstallData.php
<?php
namespace MilanDev\BottomDescription\Setup;

use Magento\Framework\Setup\InstallDataInterface;
use Magento\Framework\Setup\ModuleContextInterface;
use Magento\Framework\Setup\ModuleDataSetupInterface;
use Magento\Eav\Setup\EavSetup;
use Magento\Eav\Setup\EavSetupFactory;
use Magento\Eav\Model\Entity\Attribute\ScopedAttributeInterface;

class InstallData implements InstallDataInterface
{

    private $eavSetupFactory;

    /**
     * Constructor
     *
     * @param \Magento\Eav\Setup\EavSetupFactory $eavSetupFactory
     */
    public function __construct(EavSetupFactory $eavSetupFactory)
    {
        $this->eavSetupFactory = $eavSetupFactory;
    }

    /**
     * {@inheritdoc}
     */
    public function install(
        ModuleDataSetupInterface $setup,
        ModuleContextInterface $context
    ) {
        $eavSetup = $this->eavSetupFactory->create(['setup' => $setup]);

        $eavSetup->addAttribute(
            \Magento\Catalog\Model\Category::ENTITY,
            'bottom_description',
            [
                'type' => 'text',
                'label' => 'Description',
                'input' => 'textarea',
                'required' => false,
                'sort_order' => 4,
                'global' => ScopedAttributeInterface::SCOPE_STORE,
                'wysiwyg_enabled' => true,
                'is_html_allowed_on_front' => true,
                'group' => 'General Information',
            ]
        );
    }
}
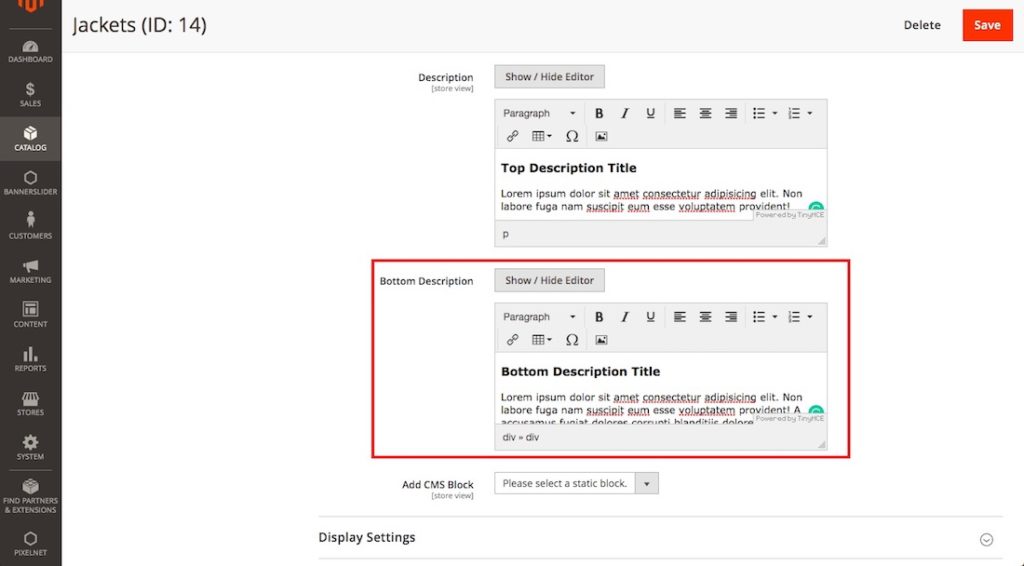
This code snippet below will add a visual Bottom Description attribute for the categories in the admin panel, which includes WYSIWYG editor enabled.
app/code/MilanDev/BottomDescription/view/adminhtml/ui_component/category_form.xml
<?xml version="1.0" ?>
<form xmlns:xsi="http://www.w3.org/2001/XMLSchema-instance" xsi:noNamespaceSchemaLocation="urn:magento:module:Magento_Ui:etc/ui_configuration.xsd">
	<fieldset name="content">
		<field name="bottom_description" template="ui/form/field" sortOrder="60" formElement="wysiwyg">
            <argument name="data" xsi:type="array">
                <item name="config" xsi:type="array">
                    <item name="wysiwygConfigData" xsi:type="array">
                        <item name="height" xsi:type="string">100px</item>
                        <item name="add_variables" xsi:type="boolean">false</item>
                        <item name="add_widgets" xsi:type="boolean">false</item>
                        <item name="add_images" xsi:type="boolean">true</item>
                        <item name="add_directives" xsi:type="boolean">true</item>
                    </item>
                    <item name="source" xsi:type="string">category</item>
                </item>
            </argument>
            <settings>
                <label translate="true">Bottom Description</label>
                <dataScope>bottom_description</dataScope>
            </settings>
            <formElements>
                <wysiwyg class="Magento\Catalog\Ui\Component\Category\Form\Element\Wysiwyg">
                    <settings>
                        <rows>8</rows>
                        <wysiwyg>true</wysiwyg>
                    </settings>
                </wysiwyg>
            </formElements>
        </field>
	</fieldset>
</form>
After adding those files above you should see the field below category description.
3. Make visible in the product listing page.
Here, we will push the texts we added in the backend. First, you need to create a phtml file which contains the attribute text. Then you can put the text to bottom in the category page.
app/code/MilanDev/BottomDescription/view/frontend/templates/product/list/bottom_description.phtml
<?php if ($_bottomDescription = $block->getCurrentCategory()->getBottomDescription()): ?>
    <div class="category-bottom-description">
        <?= /* @escapeNotVerified */ $this->helper('Magento\Catalog\Helper\Output')->categoryAttribute($block->getCurrentCategory(), $_bottomDescription, 'bottom_description') ?>
    </div>
<?php endif; ?>
Inject the text using Magento 2 layout techniques.
app/code/MilanDev/BottomDescription/view/frontend/layout/catalog_category_view.xml
<?xml version="1.0"?>
<page xmlns:xsi="http://www.w3.org/2001/XMLSchema-instance" layout="2columns-left" xsi:noNamespaceSchemaLocation="urn:magento:framework:View/Layout/etc/page_configuration.xsd">
    <body>
        <referenceContainer name="content">
            <block class="Magento\Catalog\Block\Category\View" name="bottom.description" template="MilanDev_BottomDescription::product/list/bottom_description.phtml" after="-"/>
        </referenceContainer>
    </body>
</page>
After doing all the steps above. Enable the module, generate classes and refresh the cache. If everything was well, now you should see something like this.

If you have any opinions or query please comment below. Happy Coding.