Magento 2 – Redirect 404 Product URLs to an Assigned Product Listing Page.

We recently had some severe issues with 404 product URLs on google SEO. Around 25K URLs were broken in the google search console. As the site is fully automated and has around one million products, It imports products from different sources via product feeds and external API. And exports products to Google automatically on a daily basis. 

As a result, many products get out of stock and are disabled sometimes. So, the number of 404 URLs was increasing daily in the search console.

Initially, I thought of the general URL redirection method base on the web server for resolving the issue. But It didn’t work because of the massive amount of URLs.

I had to find other ways, As the URLs are dynamic and products may come back in stock or enable again; so the redirection should not have happened.

So, I had to depend on Magento instead of doing it from Apache/NGINX. After finding some blogs and digging deep into the codebase, I found the controller_action_predispatch_cms_noroute_index event. It fires only before the 404 URLs are dispatched, not for live URLs. So, It’s the place where I need to put my redirection logic.

All I needed to do is, checking the URL type was product URL or not. If it’s a product URL, redirect to an assigned category or product listing page.

Declare the event for the front-end area only.

app/code/MilanDev/Fix404/etc/frontend/events.xml

<config xmlns:xsi="http://www.w3.org/2001/XMLSchema-instance" xsi:noNamespaceSchemaLocation="urn:magento:framework:Event/etc/events.xsd">
    <event name="controller_action_predispatch_cms_noroute_index">
        <observer name="milandev_no_route_to_live_page" instance="MilanDev\Fix404\Observer\NotFoundToLive" />
    </event>
</config>


Here is the rest of the logic.

app/code/MilanDev/Fix404/Observer/NotFoundToLive.php

<?php
declare(strict_types=1);

namespace MilanDev\Fix404\Observer;

use Magento\Catalog\Helper\Category;
use Magento\Framework\App\ActionInterface;
use Magento\Framework\Event\Observer;
use Magento\Framework\Event\ObserverInterface;
use Magento\Catalog\Api\ProductRepositoryInterface;
use Magento\Catalog\Api\CategoryRepositoryInterface;
use Magento\Framework\Exception\NoSuchEntityException;
use Magento\Store\Model\StoreManagerInterface;
use Magento\UrlRewrite\Model\ResourceModel\UrlRewriteCollectionFactory as CollectionFactory;
use Magento\Framework\App\ActionFlag;

class NotFoundToLive implements ObserverInterface
{
    /**
     * @var ProductRepositoryInterface
     */
    private $productRepository;
    /**
     * @var CollectionFactory
     */
    private $collectionFactory;
    /**
     * @var CategoryRepositoryInterface
     */
    private $categoryRepository;
    /**
     * @var Category
     */
    private $categoryHelper;
    /**
     * @var ActionFlag
     */
    private $actionFlag;
    /**
     * @var StoreManagerInterface
     */
    private $storeManager;

    /**
     * @param ProductRepositoryInterface $productRepository
     * @param CategoryRepositoryInterface $categoryRepository
     * @param Category $categoryHelper
     * @param CollectionFactory $collectionFactory
     * @param ActionFlag $actionFlag
     * @param StoreManagerInterface $storeManager
     */
    public function __construct(
        ProductRepositoryInterface $productRepository,
        CategoryRepositoryInterface $categoryRepository,
        Category $categoryHelper,
        CollectionFactory $collectionFactory,
        ActionFlag $actionFlag,
        StoreManagerInterface $storeManager
    ) {
        $this->productRepository = $productRepository;
        $this->collectionFactory = $collectionFactory;
        $this->categoryRepository = $categoryRepository;
        $this->categoryHelper = $categoryHelper;
        $this->actionFlag = $actionFlag;
        $this->storeManager = $storeManager;
    }

    /**
     * @param Observer $observer
     * @return $this
     */
    public function execute(Observer $observer)
    {
        $reqUri = trim($observer->getEvent()->getRequest()->getRequestUri(), '/');
        $baseUrl = $this->storeManager->getStore()->getBaseUrl();

        $reqUriArr = explode('/', $reqUri);
        if (count($reqUriArr) > 1) {
            $reqUri = end($reqUriArr);
        }

        $urlRewriteCollection = $this->collectionFactory->create()
            ->addFieldToSelect(['request_path', 'target_path'])
            ->addFieldToFilter('request_path', $reqUri);

        $targetPath = $urlRewriteCollection->getFirstItem()->getTargetPath();
        $productId = 0;

        if ($targetPath && strpos($targetPath, 'catalog/product/view') !== false) {
            /**
             * Redirect to products category
             */
            $targetPathArr = explode('/', $targetPath);
            $productId = end($targetPathArr);

            $categories = [];
            try {
                if ($product = $this->productRepository->getById($productId)) {
                    $categories = $product->getCategoryIds();
                }
                $categoryId = reset($categories);
                if ($categoryId && ($categoryObj = $this->categoryRepository->get($categoryId))) {
                    $catUrl = $this->categoryHelper->getCategoryUrl($categoryObj);
                    $this->actionFlag->set('', ActionInterface::FLAG_NO_DISPATCH, true);
                    $observer->getControllerAction()->getResponse()->setRedirect($catUrl);
                }
            } catch (NoSuchEntityException $e) {
            }
        }

        return $this;
    }
}

There could be many other ways to accomplish such issues. Please feel free to comment below if you know of any other ways to address this issue or have any opinions. Happy Coding.
Magento 2 – Disable WYSIWYG editor only for the pages and static blocks.

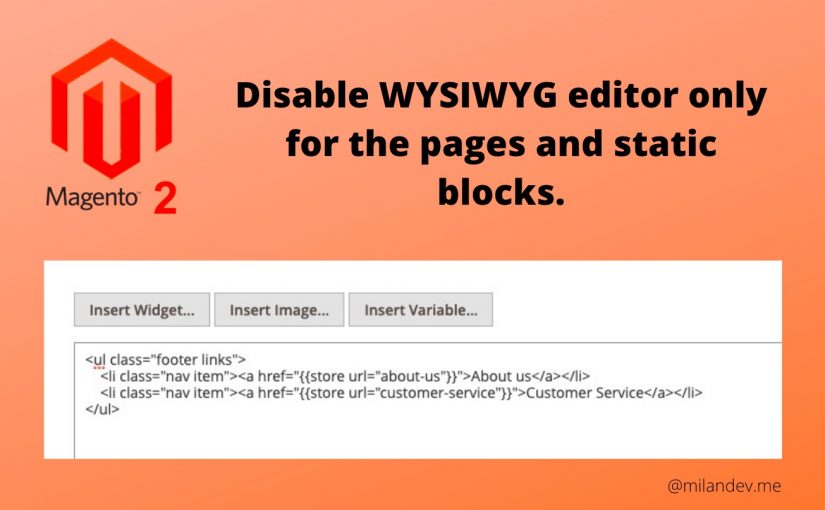
The WYSIWYG editor is a good way to show the design preview in Magento 2. It is useful most of the time. But I go through some issues when I use huge HTML markup. It causes some extra white spaces and removes few tags too. So, the design goes broken.

To address this issue, disabling the WYSIWYG editor for pages and blocks helps me a lot. Today I am going to share the workaround with you.

For any cases, If you want to disable the editor completely. You do not need to follow the whole tutorial here. Simply you can go to the following path and select the “Disable Completely” option from the dropdown menu.

Go to: Admin panel > Stores > Configuration > General > Content Management > Enable WYSIWYG Editor

Here is the coding part begins, to disable the WYSIWYG editor only for the static blocks and pages, you need to create a small module. To do so, please follow the few steps below.

Step 1: Register the module.

app/code/MilanDev/Demo/etc/module.xml

<?xml version="1.0" ?>
<config xmlns:xsi="http://www.w3.org/2001/XMLSchema-instance" xsi:noNamespaceSchemaLocation="urn:magento:framework:Module/etc/module.xsd">
	<module name="MilanDev_Demo">
		<sequence>
			<module name="Magento_Cms"/>
		</sequence>
	</module>
</config>

app/code/MilanDev/Demo/registration.php

<?php
use Magento\Framework\Component\ComponentRegistrar;

ComponentRegistrar::register(ComponentRegistrar::MODULE, 'MilanDev_Demo', __DIR__);

Step 2: Implement the logics

To implement this logic you need to customize the IsEnabled method into the Magento\Cms\Model\Wysiwyg\Config class. To do so, you need to use Magento 2 plugins system. If you are not aware of the Magento 2 plugins you should check it out on their official docs.

In short, Plugins allow you to extend or change the behavior of Magento without changing the original classes.

Here, I register my own plugin class MilanDev\Demo\Plugin\Backend\Magento\Cms\Model\Wysiwyg\Config in the di.xml file and implemented the logics.

app/code/MilanDev/Demo/etc/adminhtml/di.xml

<?xml version="1.0" ?>
<config xmlns:xsi="http://www.w3.org/2001/XMLSchema-instance" xsi:noNamespaceSchemaLocation="urn:magento:framework:ObjectManager/etc/config.xsd">
	<type name="Magento\Cms\Model\Wysiwyg\Config">
		<plugin 
			name="MilanDev_Demo_Plugin_Backend_Magento_Cms_Model_Wysiwyg_Config" 
			type="MilanDev\Demo\Plugin\Backend\Magento\Cms\Model\Wysiwyg\Config" sortOrder="10" disabled="false"/>
	</type>
</config>

app/code/MilanDev/Demo/Plugin/Backend/Magento/Cms/Model/Wysiwyg/Config.php

<?php
declare(strict_types=1);

namespace MilanDev\Demo\Plugin\Backend\Magento\Cms\Model\Wysiwyg;

class Config
{
    protected $request;

    public function __construct(
        \Magento\Framework\App\Request\Http $request
    ){
        $this->request = $request;
    }

    public function afterIsEnabled(
        \Magento\Cms\Model\Wysiwyg\Config $subject,
        $result
    )
    {
        $moduleName = $this->request->getModuleName();
        
        if ($moduleName === 'cms') {
            return false;
        }
        return $result;
    }
}


After doing all the steps above please run the necessary commands to clean caches and generate dependency classes.

If you know any other ways to address this issue or have any opinions please feel free to comment below. Happy Coding.

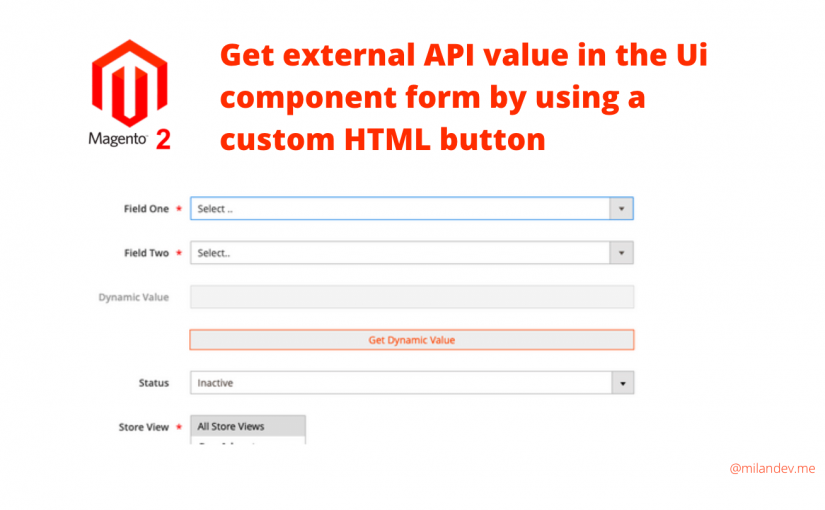
Magento 2 – How to get external API value in the Ui component form by using a custom HTML button.

A few days ago I was working on a backend CRUD module. There was a task to get a dynamic value from external API based on the selected values of two fields and update an input field before saving form data.

Adding custom HTML contents on the Ui component form and fetching data from an external source was unknown to me. So, I decided to write a short article about this issue. So, here I am today.

To accomplish this task, I had to add a custom button in my Ui component form and bind a click event on this button. While clicking on the button It hits an ajax request to a controller where I put my API code.

I hope, You have your own custom module already. If you need these kinds of requirements please follow the steps below.

I am using Milandev_Demo as my module name and milandev_demo as backend router name.

1. Add HTML button inside Ui form fieldset

Basically htmlContent is required to add a custom element in the Ui form and one block needs to add there. Please follow the convention and file paths.
app/code/Milandev/Demo/view/adminhtml/ui_component/milandev_demo_demo_form.xml

<!-- ... -->
<htmlContent name="html_content">
    <block name="mc_dynamic_value" class="Magento\Backend\Block\Template" template="Milandev_Demo::get_dynamic_value.phtml"/>
</htmlContent>
<!-- ... -->

This section contains the html button and few javascript to make ajax call to our API controller.
app/code/Milandev/Demo/view/adminhtml/templates/get_dynamic_value.phtml

<a href="javascript:void(0)" 
    id="mc_get_dynamic_value" 
    style="width: 630px; 
        display: block; 
        background: #eee; 
        text-align: center; 
        margin: 0 auto 30px; 
        border: 1px solid #eb5202; 
        color: #eb5202; padding: 4px 0;">Get Dynamic Value</a>

<script>
    require(['jquery'], function($){
        $('#mc_get_dynamic_value').on('click', function(e){
            $("div[data-role='spinner']").show();
            let api_controller_url = window.api_controller_url;
            let field_one = $("select[name='field_one']").val();
            let field_two = $("select[name='field_two']").val();
            $.ajax({
                url : api_controller_url,
                type : 'POST',
                data: {
                    field_one_v: field_one,
                    field_two_v: field_two,
                    format: 'json',
                    form_key: window.FORM_KEY
                },
                dataType:'json',
                success : function(data) {
                    $("div[data-role='spinner']").hide();
                    $("input[name='dynamic_value']").val(data).change();
                },
                error : function(request,error)
                {
                    console.error('Dynamic Value Fetching Error!');
                }
            });
        });
    });
</script>

2. Add a JavaScript block to get controller URL

Here I need to add a JS block where I will define a normal javascript variable that is used in the previous phtml block file above.
app/code/Milandev/Demo/view/adminhtml/layout/milandev_demo_demo_edit.xml

<?xml version="1.0"?>
<page xmlns:xsi="http://www.w3.org/2001/XMLSchema-instance" layout="admin-1column" xsi:noNamespaceSchemaLocation="urn:magento:framework:View/Layout/etc/page_configuration.xsd">
    <body>
        <referenceContainer name="js">
            <block class="Magento\Backend\Block\Template" name="custom_js_backend" template="Milandev_Demo::js.phtml"/>
        </referenceContainer>
        <referenceContainer name="content">
            <uiComponent name="milandev_demo_demo_form"/>
        </referenceContainer>
    </body>
</page>

Create the block file in the following location and add the snippet below.
app/code/Milandev/Demo/view/adminhtml/templates/js.phtml

<script>
    require([
     "prototype"
    ], function () {
        window.api_controller_url = '<?= /** @noEscape */ $block->getUrl('milandev_demo/api');?>';
    });
</script>

3. Create controller (API) file

This file will contact to external API and returns a json value.
app/code/Milandev/Demo/Controller/Adminhtml/Api.php

<?php declare(strict_types=1);
namespace Milandev\Demo\Controller\Adminhtml;

class Api extends \Magento\Backend\App\Action
{
    protected $resultPageFactory;
    protected $jsonHelper;

    /**
     * Constructor
     *
     * @param \Magento\Backend\App\Action\Context  $context
     * @param \Magento\Framework\View\Result\PageFactory $resultPageFactory
     * @param \Magento\Framework\Json\Helper\Data $jsonHelper
     * @param \Psr\Log\LoggerInterface $logger
     */
    public function __construct(
        \Magento\Backend\App\Action\Context $context,
        \Magento\Framework\View\Result\PageFactory $resultPageFactory,
        \Magento\Framework\Json\Helper\Data $jsonHelper,
        \Psr\Log\LoggerInterface $logger
    ) {
        $this->resultPageFactory = $resultPageFactory;
        $this->jsonHelper = $jsonHelper;
        $this->logger = $logger;
        parent::__construct($context);
    }

    /**
     * Execute view action
     *
     * @return \Magento\Framework\Controller\ResultInterface
     */
    public function execute()
    {
        try {
            $params = $this->getRequest()->getParams();
            $fieldOneValue = $params['field_one_v'];
            $fieldTwoValue = $params['field_two_v'];

            // start api calling
            $service_url = 'https://example.com/getlist?oneParam='.$fieldOneValue.'&twoParam='.$fieldTwoValue;
            $handle = curl_init();

            curl_setopt($handle, CURLOPT_HTTPAUTH, CURLAUTH_BASIC);
            curl_setopt($handle, CURLOPT_USERPWD, "user:pass"); // put username and password if required
            curl_setopt($handle, CURLOPT_URL, $service_url);
            curl_setopt($handle, CURLOPT_RETURNTRANSFER, true);
            curl_setopt($handle, CURLOPT_SSL_VERIFYHOST, false);
            curl_setopt($handle, CURLOPT_SSL_VERIFYPEER, false);

            $apiResult = curl_exec($handle);
            $code = curl_getinfo($handle, CURLINFO_HTTP_CODE);
            curl_close($handle);

            $resultObjts = json_decode($apiResult);
            
            $dynamicValue = $resultObjts['dynamic_value'];
            // end api calling
            
            return $this->jsonResponse($dynamicValue);
            
        } catch (\Magento\Framework\Exception\LocalizedException $e) {
            return $this->jsonResponse($e->getMessage());
        } catch (\Exception $e) {
            $this->logger->critical($e);
            return $this->jsonResponse($e->getMessage());
        }
    }

    /**
     * Create json response
     *
     * @return \Magento\Framework\Controller\ResultInterface
     */
    public function jsonResponse($response = '')
    {
        return $this->getResponse()->representJson(
            $this->jsonHelper->jsonEncode($response)
        );
    }
}

This is what I did to make it possible. Please share your thought if you know the other ways to make the same thing happened. Happy Coding!

Ionic 4.x with Magento 2.x – Get products using REST API

Working with Ionic 4.x and Magento 2.x was problematic for me. So, I decided to write an article about Ionic 4 and Magento 2. Today, I am going to show you, how to connect Ionic with Magento and get products by using REST API.

First, I will fix some configurations to avoid unexpected behaviors then the coding part.

Magento 2 – .htaccess configuration to avoid Cross-Origin Resource Sharing (CORS) errors.

The most important part is when making requests from Ionic to Magento 2, the CORS error should arise if you do not configure properly.
CORS is a W3C standard mechanism that allows communicating and sharing data between different sources or domains. It defines some rules to tell the system in which a browser and server can interact to determine whether it is safe.
To avoid this kind of error in the console please add the following code into your Magento’s root .htaccess file.

RewriteEngine on
RewriteCond %{REQUEST_METHOD} OPTIONS
RewriteRule ^(.*)$ "index.html" [R=200,E=API:1,PT]
<IfModule mod_headers.c>
    SetEnvIf Accept application/json API
    Header always set Access-Control-Allow-Origin "*" env=API
    Header always set Access-Control-Allow-Methods "POST, GET, OPTIONS, DELETE, PUT" env=API
    Header always set Access-Control-Allow-Headers "Access-Control-Allow-Headers, Origin, Accept, X-Requested-With, Content-Type, Access-Control-Request-Method, Access-Control-Request-Headers, Authorization" env=API
</IfModule>

Ionic 4 – Making the product page ready

I assume that you know about Ionic basic. So, I am not describing here how to install, generates pages and other related kinds of stuff.

Here, We will use the Magento REST API to fetch data. Because Magento 2’s REST API is more stable than Magento 1 REST API, availability of more endpoints and easy to use.

We need to import HttpClientModule in our Ionic app to make HTTP request to Magento 2’s API.
src/app/app.module.ts

// ...
import { HttpClientModule } from '@angular/common/http';
// ...
@NgModule({
  // ...
  imports: [
    // ...
    HttpClientModule
  ],
  // ...
})
export class AppModule {}

I generated a products page where I will fetch product data.
There are few authentication methods but I used Token-based authentication system to communicate with Magento.

Basically, I code into src/app/products/products.page.ts mostly. Imported HttpClient to make the HTTP requests. Wrote two methods, getAuthToken for getting token and getProducts for pulling products into Ionic from Magento. To get products I used Magento’s rest/V1/products endpoint and added some filter logics there, like filtering by category id, sorting order, count products, pagination, etc.

src/app/products/products.page.ts

import { Component, OnInit } from '@angular/core';
import { HttpClient } from '@angular/common/http'; // need to import to make http request

@Component({
  selector: 'app-products',
  templateUrl: './products.page.html',
  styleUrls: ['./products.page.scss'],
})
export class ProductsPage implements OnInit {

  public baseUrl = 'http://mage2.local/';
  public apiEndPoint = this.baseUrl + 'rest/V1/products';

  private userName = 'admin'; // add your username
  private userPass = 'pass123'; // add your passwoord
  private adminToken: any;

  public prodItems: Array<{ id: string; sku: string; name: string; image: string; price: string }> = [];

  constructor(
    private http: HttpClient // inject HttpClient
  ) { }

  ngOnInit() {
    this.getAuthToken();
  }

  /**
   * get authorization token from magento2
   */
  getAuthToken() {
    const formData = new FormData(); 
    formData.append('username', this.userName);
    formData.append('password', this.userPass);

    const adminTokenPoint = this.baseUrl + 'rest/V1/integration/admin/token';
    // make http post request to magento2 api
    this.http.post<any>(adminTokenPoint, formData)
      .subscribe(
        res => {
          this.adminToken = res;
          this.getProducts(res);
        },
        err => {
          console.log(err);
        }
      );
  }

  /**
   * get products from magento2 category
   * @param adminTokenStr
   */
  getProducts(adminTokenStr: string) {
    const adminToken = adminTokenStr;
    const categoryId = 3; // get products from category id 3
    const sortOderType = 'DESC'; // sort order type
    const pageSize = 10; // number of products
    const currentPage = 1; // get products for first page
    const apiEndPoint = `
    ${this.apiEndPoint}?searchCriteria[filterGroups][0][filters][0][field]=category_id&
    searchCriteria[filterGroups][0][filters][0][value]=${categoryId}&
    searchCriteria[filterGroups][0][filters][0][conditionType]=eq&
    searchCriteria[sortOrders][0][field]=created_at&
    searchCriteria[sortOrders][0][direction]=${sortOderType}&
    searchCriteria[pageSize]=${pageSize}&
    searchCriteria[currentPage]=${currentPage}
    `;

    // make http request to magento2's api
    this.http.get<any>(apiEndPoint, {
      headers: {'Content-Type':'application/json', 'Authorization':'Bearer ' + adminToken}
      }).subscribe(
        res => {
          console.log('res');
          console.log(res);
          const prodsArr = res.items;

          prodsArr.forEach((item)=>{
          const imagePath = `${this.baseUrl}pub/media/catalog/product${item.custom_attributes[0].value}`;
          this.prodItems.push({
              id: item.id,
              sku: item.sku,
              name: item.name,
              image: imagePath,
              price: item.price,
            });
          });
        },
        err => {
          console.log(err);
        }
      );
  }

}

I stored all products on prodItems variable in the products.page.js file. So, I iterate that variable in the following page to generate a product listing into Ionic.
src/app/products/products.page.html

<ion-header>
  <ion-toolbar>
    <ion-title>products</ion-title>
  </ion-toolbar>
</ion-header>

<ion-content>    
  <ion-grid>
    <ion-row>
      <ion-col size="6" *ngFor="let item of prodItems">
        <div class="item item-{{item.id}}">
          <ion-img src="{{item.image}}"></ion-img>
          <div class="ion-text-center">
            <ion-text>price: {{item.price}}</ion-text>
            <ion-label>{{item.name}}</ion-label>
          </div>
        </div>
      </ion-col>
    </ion-row>
  </ion-grid>
</ion-content>

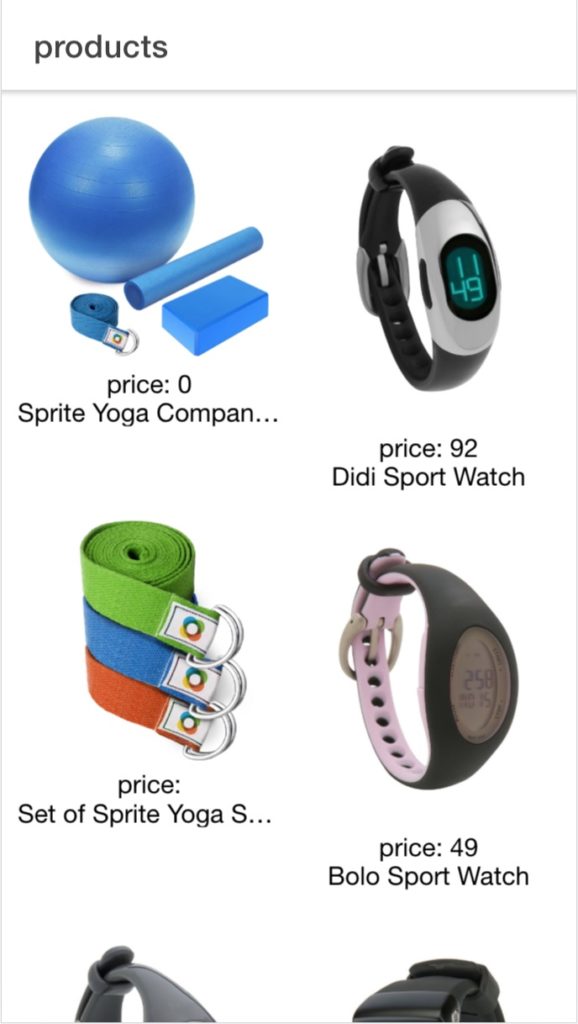
Here we come, this is the final output page into Ionic.

Ionic Product Listing Page

I know It is not a good practice to put all things into one page. Like, I could make separate the token-based auth function to a different place as common service class but I wanted to make it simple and concise.

You may know any different better approaches to accomplish this issue. So, You can share your thought in the comment box below. That’s it for today. Happy Coding!

Magento 2 – How to add extra category description in the product listing page.

Today, I am going to show you how to add an extra bottom description in the category page. This allows for adding a long description text. It is very useful when store owners want to add SEO text or extended description for any category.

By default, Magento 2 has only one description in the above of category page. Which is basically a short description field in the backend. So If you want to add another description please follow the steps below.

1. Create a basic module.

Declar module by creating module.xml and registration.php files. Let’s say the module name is MilanDev_BottomDescription.

In the module.xml file notice the sequence node which holds the dependent module Magento_Catalog for your custom module.
app/code/MilanDev/BottomDescription/etc/module.xml

<?xml version="1.0" ?>
<config xmlns:xsi="http://www.w3.org/2001/XMLSchema-instance" xsi:noNamespaceSchemaLocation="urn:magento:framework:Module/etc/module.xsd">
	<module name="MilanDev_BottomDescription" setup_version="1.0.0">
		<sequence>
			<module name="Magento_Catalog"/>
		</sequence>
	</module>
</config>

app/code/MilanDev/BottomDescription/registration.php

<?php
\Magento\Framework\Component\ComponentRegistrar::register(
    \Magento\Framework\Component\ComponentRegistrar::MODULE,
    'MilanDev_BottomDescription',
    __DIR__
);

2. Create the Bottom Description field in the backend.

This following file will create a bottom_description category attribute in the database.
app/code/MilanDev/BottomDescription/Setup/InstallData.php

<?php
namespace MilanDev\BottomDescription\Setup;

use Magento\Framework\Setup\InstallDataInterface;
use Magento\Framework\Setup\ModuleContextInterface;
use Magento\Framework\Setup\ModuleDataSetupInterface;
use Magento\Eav\Setup\EavSetup;
use Magento\Eav\Setup\EavSetupFactory;
use Magento\Eav\Model\Entity\Attribute\ScopedAttributeInterface;

class InstallData implements InstallDataInterface
{

    private $eavSetupFactory;

    /**
     * Constructor
     *
     * @param \Magento\Eav\Setup\EavSetupFactory $eavSetupFactory
     */
    public function __construct(EavSetupFactory $eavSetupFactory)
    {
        $this->eavSetupFactory = $eavSetupFactory;
    }

    /**
     * {@inheritdoc}
     */
    public function install(
        ModuleDataSetupInterface $setup,
        ModuleContextInterface $context
    ) {
        $eavSetup = $this->eavSetupFactory->create(['setup' => $setup]);

        $eavSetup->addAttribute(
            \Magento\Catalog\Model\Category::ENTITY,
            'bottom_description',
            [
                'type' => 'text',
                'label' => 'Description',
                'input' => 'textarea',
                'required' => false,
                'sort_order' => 4,
                'global' => ScopedAttributeInterface::SCOPE_STORE,
                'wysiwyg_enabled' => true,
                'is_html_allowed_on_front' => true,
                'group' => 'General Information',
            ]
        );
    }
}

This code snippet below will add a visual Bottom Description attribute for the categories in the admin panel, which includes WYSIWYG editor enabled.
app/code/MilanDev/BottomDescription/view/adminhtml/ui_component/category_form.xml

<?xml version="1.0" ?>
<form xmlns:xsi="http://www.w3.org/2001/XMLSchema-instance" xsi:noNamespaceSchemaLocation="urn:magento:module:Magento_Ui:etc/ui_configuration.xsd">
	<fieldset name="content">
		<field name="bottom_description" template="ui/form/field" sortOrder="60" formElement="wysiwyg">
            <argument name="data" xsi:type="array">
                <item name="config" xsi:type="array">
                    <item name="wysiwygConfigData" xsi:type="array">
                        <item name="height" xsi:type="string">100px</item>
                        <item name="add_variables" xsi:type="boolean">false</item>
                        <item name="add_widgets" xsi:type="boolean">false</item>
                        <item name="add_images" xsi:type="boolean">true</item>
                        <item name="add_directives" xsi:type="boolean">true</item>
                    </item>
                    <item name="source" xsi:type="string">category</item>
                </item>
            </argument>
            <settings>
                <label translate="true">Bottom Description</label>
                <dataScope>bottom_description</dataScope>
            </settings>
            <formElements>
                <wysiwyg class="Magento\Catalog\Ui\Component\Category\Form\Element\Wysiwyg">
                    <settings>
                        <rows>8</rows>
                        <wysiwyg>true</wysiwyg>
                    </settings>
                </wysiwyg>
            </formElements>
        </field>
	</fieldset>
</form>

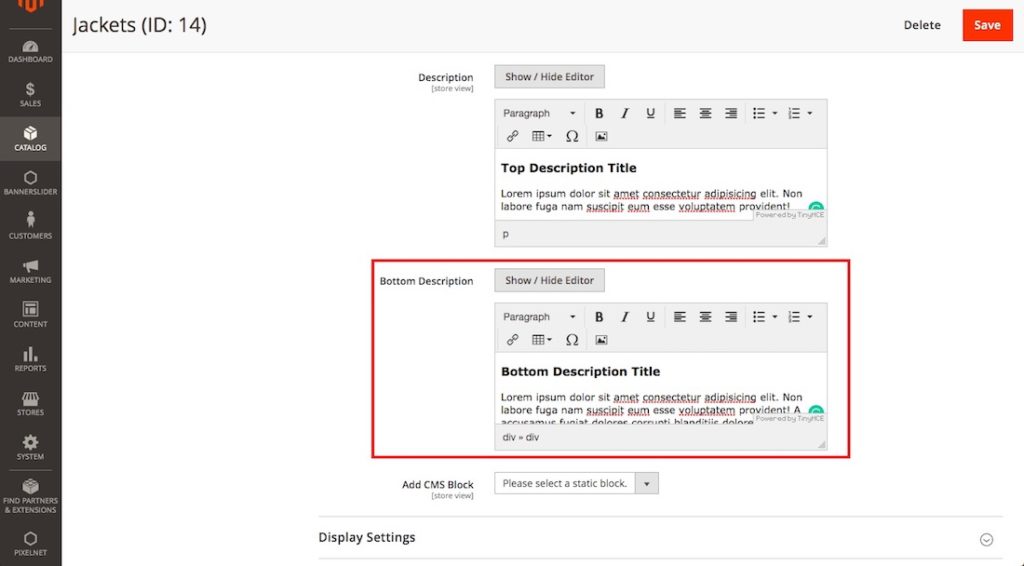
After adding those files above you should see the field below category description.

Bottom Description field in the backend.

3. Make visible in the product listing page.

Here, we will push the texts we added in the backend. First, you need to create a phtml file which contains the attribute text. Then you can put the text to bottom in the category page.
app/code/MilanDev/BottomDescription/view/frontend/templates/product/list/bottom_description.phtml

<?php if ($_bottomDescription = $block->getCurrentCategory()->getBottomDescription()): ?>
    <div class="category-bottom-description">
        <?= /* @escapeNotVerified */ $this->helper('Magento\Catalog\Helper\Output')->categoryAttribute($block->getCurrentCategory(), $_bottomDescription, 'bottom_description') ?>
    </div>
<?php endif; ?>

Inject the text using Magento 2 layout techniques.
app/code/MilanDev/BottomDescription/view/frontend/layout/catalog_category_view.xml

<?xml version="1.0"?>
<page xmlns:xsi="http://www.w3.org/2001/XMLSchema-instance" layout="2columns-left" xsi:noNamespaceSchemaLocation="urn:magento:framework:View/Layout/etc/page_configuration.xsd">
    <body>
        <referenceContainer name="content">
            <block class="Magento\Catalog\Block\Category\View" name="bottom.description" template="MilanDev_BottomDescription::product/list/bottom_description.phtml" after="-"/>
        </referenceContainer>
    </body>
</page>

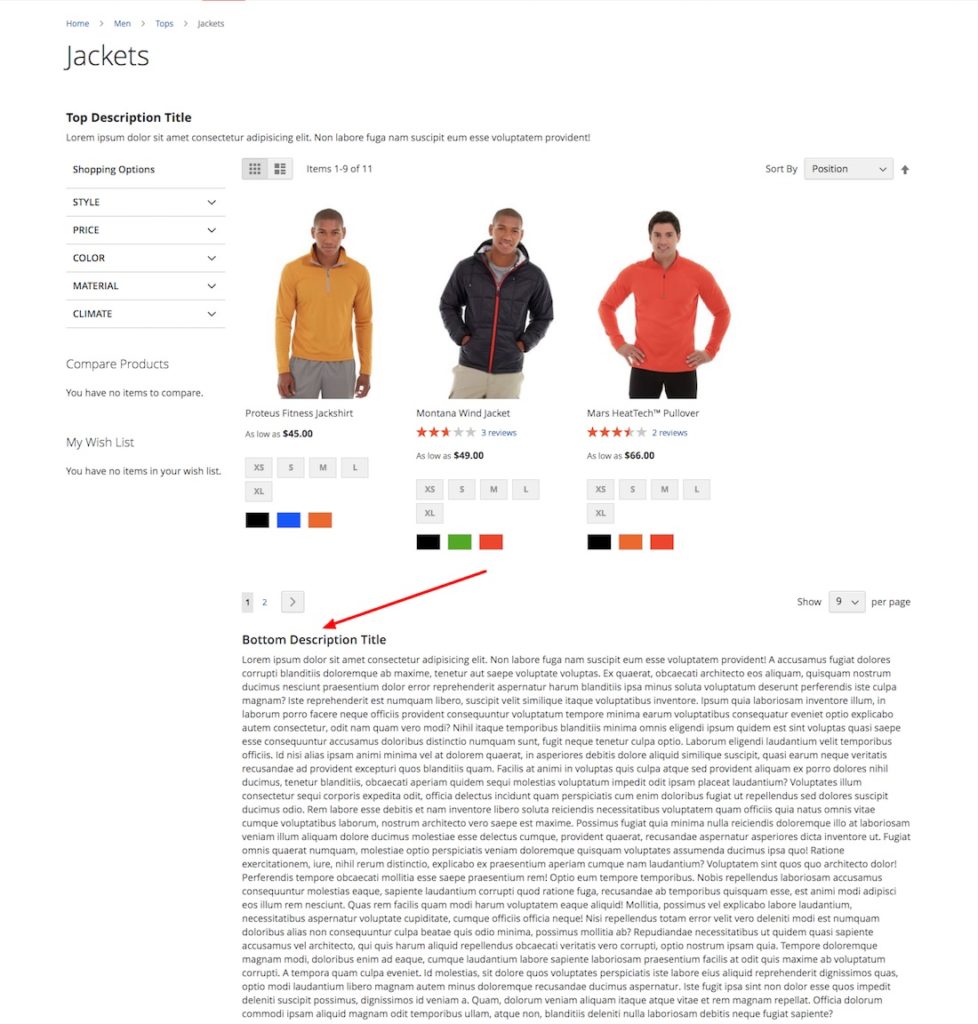
After doing all the steps above. Enable the module, generate classes and refresh the cache. If everything was well, now you should see something like this.

Bottom Description in the product listing page.

If you have any opinions or query please comment below. Happy Coding.

Magento 2 – Custom pattern and error message for field validation in the admin panel

This article will help you to show how to add custom pattern and validation error message for a text field in the admin panel.

First, you need to create a category attribute using a module setup script and you can add validation on the XML file.

Add the setup script to create a category attribute in the following file.
app/code/MilanDev/CustomField/Setup/InstallData.php

<?php


namespace MilanDev\CustomField\Setup;

use Magento\Framework\Setup\InstallDataInterface;
use Magento\Framework\Setup\ModuleContextInterface;
use Magento\Framework\Setup\ModuleDataSetupInterface;
use Magento\Eav\Setup\EavSetup;
use Magento\Eav\Setup\EavSetupFactory;

class InstallData implements InstallDataInterface
{

    private $eavSetupFactory;

    /**
     * Constructor
     *
     * @param \Magento\Eav\Setup\EavSetupFactory $eavSetupFactory
     */
    public function __construct(EavSetupFactory $eavSetupFactory)
    {
        $this->eavSetupFactory = $eavSetupFactory;
    }

    /**
     * {@inheritdoc}
     */
    public function install(
        ModuleDataSetupInterface $setup,
        ModuleContextInterface $context
    ) {
        $eavSetup = $this->eavSetupFactory->create(['setup' => $setup]);

        $eavSetup->addAttribute(
            \Magento\Catalog\Model\Category::ENTITY,
            'my_custom_field',
            [
                'type' => 'varchar',
                'label' => 'My Custom Field',
                'input' => 'text',
                'sort_order' => 333,
                'source' => '',
                'global' => 1,
                'visible' => true,
                'required' => false,
                'user_defined' => false,
                'default' => null,
                'group' => 'General Information',
                'backend' => ''
            ]
        );
    }
}

Now, add the custom pattern and validation error message in the following.
app/code/MilanDev/CustomField/view/adminhtml/ui_component/category_form.xml

<?xml version="1.0" ?>
<form xmlns:xsi="http://www.w3.org/2001/XMLSchema-instance" xsi:noNamespaceSchemaLocation="urn:magento:module:Magento_Ui:etc/ui_configuration.xsd">
	<fieldset name="general">
		<field name="my_custom_field">
			<argument name="data" xsi:type="array">
				<item name="config" xsi:type="array">
					<item name="required" xsi:type="boolean">false</item>
					<item name="sortOrder" xsi:type="number">333</item>
					<item name="dataType" xsi:type="string">string</item>
					<item name="formElement" xsi:type="string">input</item>
					<item name="label" translate="true" xsi:type="string">My Custom Field</item>
					<item name="validation" xsi:type="array">
						<item name="required-entry" xsi:type="array">
							<item name="validate" xsi:type="boolean">true</item>
							<item name="message" xsi:type="string">Custom error message for required field.</item>
						</item>
						<item name="pattern" xsi:type="array">
							<item name="validate" xsi:type="boolean">true</item>
							<item name="value" xsi:type="string">/^[A-Za-z]+[A-Za-z0-9_]+$/i</item>
							<item name="message" xsi:type="string">Custom error message for pattern validation</item>
						</item>
					</item>
				</item>
			</argument>
		</field>
	</fieldset>
</form>

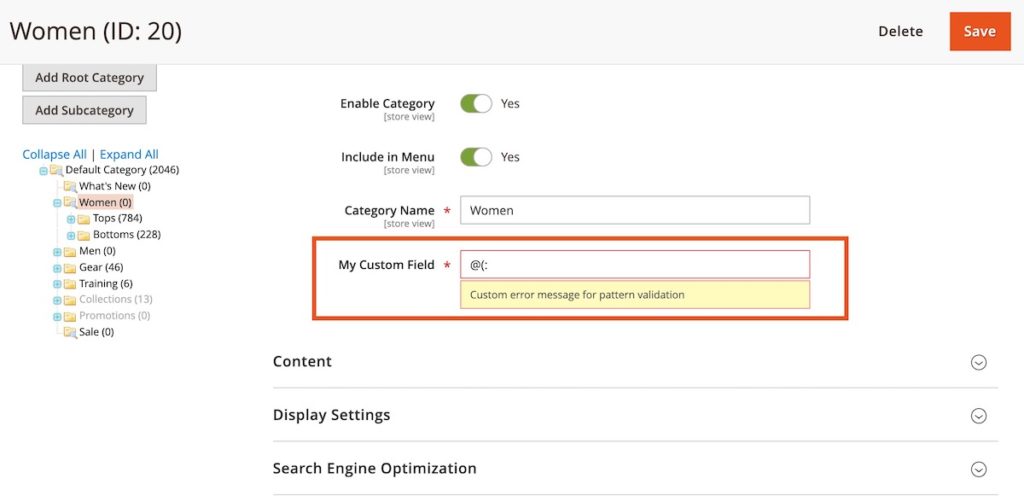
After following the above steps you can input the wrong characters and check. You should see something in the screenshot.

Magento 2 – Customer pattern and error message in the admin panel.

I hope, these tips and tricks will help you. Happy Coding.

Magento 2 – Disable Shipping Method at Checkout Based on Product’s Custom Attribute.

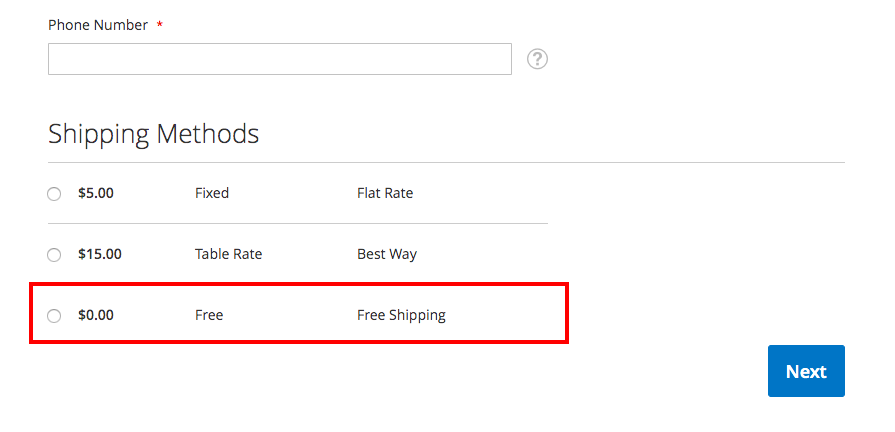
Today, I am going to show how you can disable the free shipping method based on product attribute (no_free_shipping) in the checkout page.

To accomplish this solution I will use Magento 2 Plugin (Interceptor) system and rewrite the logic into collectCarrierRates method (class Magento\Shipping\Model\Shipping) by using around plugin system. So our plugin method name will be aroundCollectCarrierRates. If you don’t know about the Magento 2 plugin system please check on their official documentation for further information.

Let’s create a product attribute named no_free_shipping.

Create a basic module (Milandev_ShippingHide) by adding registration.php and module.xml files.
app/code/Milandev/ShippingHide/etc/module.xml

<?xml version="1.0" ?>
<config xmlns:xsi="http://www.w3.org/2001/XMLSchema-instance" xsi:noNamespaceSchemaLocation="urn:magento:framework:Module/etc/module.xsd">
	<module name="Milandev_ShippingHide" setup_version="1.0.0">
		<sequence>
			<module name="Magento_Shipping"/>
		</sequence>
	</module>
</config>

app/code/Milandev/ShippingHide/registration.php

<?php
\Magento\Framework\Component\ComponentRegistrar::register(
    \Magento\Framework\Component\ComponentRegistrar::MODULE,
    'Milandev_ShippingHide',
    __DIR__
);

Declare the plugin class for core Magento\Shipping\Model\Shipping in the following file.
app/code/Milandev/ShippingHide/etc/di.xml

<?xml version="1.0" ?>
<config xmlns:xsi="http://www.w3.org/2001/XMLSchema-instance" xsi:noNamespaceSchemaLocation="urn:magento:framework:ObjectManager/etc/config.xsd">
	<type name="Magento\Shipping\Model\Shipping">
		<plugin disabled="false" name="Milandev_ShippingHide_Plugin_Magento_Shipping_Model_Shipping" sortOrder="10" type="Milandev\ShippingHide\Plugin\Magento\Shipping\Model\Shipping"/>
	</type>
</config>

This is the final plugin class, which return false for free shipping method, while cart products have no_free_shipping is selected to yes.
app/code/Milandev/ShippingHide/Plugin/Magento/Shipping/Model/Shipping.php

<?php
namespace Milandev\ShippingHide\Plugin\Magento\Shipping\Model;

class Shipping
{
    protected $product;

    public function __construct(
        \Magento\Catalog\Model\ProductFactory $product
    ) {
        $this->product = $product; 
    }

    public function aroundCollectCarrierRates(
        \Magento\Shipping\Model\Shipping $subject,
        \Closure $proceed,
        $carrierCode,
        $request
    ) {
        $noFreeShipping = false;
        $allItems = $request->getAllItems();
        
        // iterate all cart products to check if no_free_shipping is true
        foreach ($allItems as $item) {    
            $_product = $this->product->create()->load($item->getProduct()->getId());
            // if product has no_free_shipping true
            if ($_product->getNoFreeShipping()) {
                $noFreeShipping = true;
                break;
            }
        }
        // if no_free_shipping is yes and shipping method free shipping return nothing
        if ($noFreeShipping && $carrierCode == 'freeshipping') {
            return false;
        }

        $result = $proceed($carrierCode, $request);
        return $result;
    }
}

That’s it.

Magento 2 – How to add custom thumbnail images in submenu items.

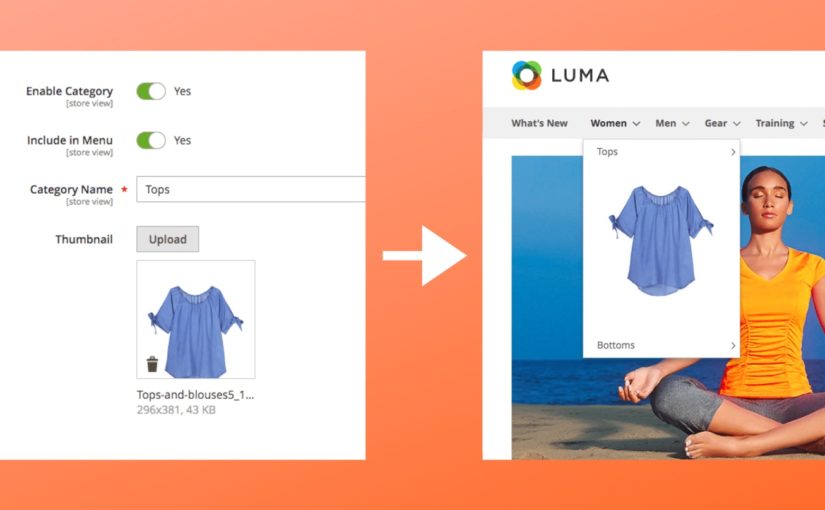
Adding images in sub-menu is a common feature for most of the online store. Today, I was working on this issue to extend the menu. So, I want to share my experience with you. To accomplish this feature you should follow the things below:

1. Create a basic module.

Register a basic module (Milandev_CustomMenu) by creating some basic files like etc/module.xml , composer.json, registration.php.

2. Add a category attribute.

Create a category attribute cat_thumbnail (notice the highlighted lines below) for thumbnail image. We will show it in the frontend menu items.
app/code/Milandev/CustomMenu/Setup/InstallData.php

<?php
namespace Milandev\CustomMenu\Setup;

use Magento\Framework\Setup\InstallDataInterface;
use Magento\Framework\Setup\ModuleContextInterface;
use Magento\Framework\Setup\ModuleDataSetupInterface;
use Magento\Eav\Setup\EavSetup;
use Magento\Eav\Setup\EavSetupFactory;

class InstallData implements InstallDataInterface
{

    private $eavSetupFactory;

    /**
     * Constructor
     *
     * @param \Magento\Eav\Setup\EavSetupFactory $eavSetupFactory
     */
    public function __construct(EavSetupFactory $eavSetupFactory)
    {
        $this->eavSetupFactory = $eavSetupFactory;
    }

    /**
     * {@inheritdoc}
     */
    public function install(
        ModuleDataSetupInterface $setup,
        ModuleContextInterface $context
    ) {
        $eavSetup = $this->eavSetupFactory->create(['setup' => $setup]);

        $eavSetup->addAttribute(
            \Magento\Catalog\Model\Category::ENTITY,
            'cat_thumbnail',
            [
                'type' => 'varchar',
                'label' => 'Thumbnail',
                'input' => 'image',
                'sort_order' => 333,
                'source' => '',
                'global' => 1,
                'visible' => true,
                'required' => false,
                'user_defined' => false,
                'default' => null,
                'group' => 'General Information',
                'backend' => 'Magento\Catalog\Model\Category\Attribute\Backend\Image'
            ]
        );
    }
}

Add the category admin UI component for the created attribute above.
app/code/Milandev/CustomMenu/view/adminhtml/ui_component/category_form.xml

<?xml version="1.0" ?>
<form xmlns:xsi="http://www.w3.org/2001/XMLSchema-instance" xsi:noNamespaceSchemaLocation="urn:magento:module:Magento_Ui:etc/ui_configuration.xsd">
	<fieldset name="general">
		<field name="cat_thumbnail">
			<argument name="data" xsi:type="array">
				<item name="config" xsi:type="array">
					<item name="required" xsi:type="boolean">false</item>
					<item name="validation" xsi:type="array">
						<item name="required-entry" xsi:type="boolean">false</item>
					</item>
					<item name="sortOrder" xsi:type="number">333</item>
					<item name="dataType" xsi:type="string">string</item>
					<item name="formElement" xsi:type="string">fileUploader</item>
					<item name="label" translate="true" xsi:type="string">Thumbnail</item>
					<item name="uploaderConfig" xsi:type="array">
						<item name="url" path="catalog/category_image/upload" xsi:type="url"/>
					</item>
					<item name="elementTmpl" xsi:type="string">ui/form/element/uploader/uploader</item>
					<item name="previewTmpl" xsi:type="string">Magento_Catalog/image-preview</item>
				</item>
			</argument>
		</field>
	</fieldset>
</form>

3. Overwrite the default menu class with your module class.

In this section, you have to replace the default menu with your module menu. First, let’s overwrite the default menu class.
app/code/Milandev/CustomMenu/etc/di.xml

<?xml version="1.0"?>
<config xmlns:xsi="http://www.w3.org/2001/XMLSchema-instance" xsi:noNamespaceSchemaLocation="urn:magento:framework:ObjectManager/etc/config.xsd">
    <preference for="Magento\Theme\Block\Html\Topmenu" type="Milandev\CustomMenu\Block\Html\Topmenu" />
</config>

Now create your own module class. Actually, you need to extend the default menu class to your module class. Please notice the getCustomThumbnail method. Which is responsible for rendering the thumbnail image from categories.
app/code/Milandev/CustomMenu/Block/Html/Topmenu.php

<?php
namespace Milandev\CustomMenu\Block\Html;
 
use Magento\Framework\Data\Tree\Node;
use Magento\Framework\DataObject;
use Magento\Framework\View\Element\Template;
use Magento\Framework\Data\Tree\NodeFactory;
use Magento\Framework\Data\TreeFactory;
 
class Topmenu extends \Magento\Theme\Block\Html\Topmenu
{
    protected $_categoryFactory;
    protected $_storeManager;
    
    public function __construct(
        Template\Context $context,
        NodeFactory $nodeFactory,
        TreeFactory $treeFactory,
        \Magento\Catalog\Model\ResourceModel\Category\CollectionFactory $collecionFactory,
        \Magento\Store\Model\StoreManagerInterface $storeManager,
        array $data = []
        ) {
            parent::__construct($context, $nodeFactory, $treeFactory, $data);
            $this->_categoryFactory = $collecionFactory;
            $this->_storeManager = $storeManager;
        
    }

    protected function _getHtml(
        \Magento\Framework\Data\Tree\Node $menuTree,
        $childrenWrapClass,
        $limit,
        array $colBrakes = []
    ) {
        $html = '';

        $children = $menuTree->getChildren();
        $parentLevel = $menuTree->getLevel();
        $childLevel = $parentLevel === null ? 0 : $parentLevel + 1;

        $counter = 1;
        $itemPosition = 1;
        $childrenCount = $children->count();

        $parentPositionClass = $menuTree->getPositionClass();
        $itemPositionClassPrefix = $parentPositionClass ? $parentPositionClass . '-' : 'nav-';

        /** @var \Magento\Framework\Data\Tree\Node $child */
        foreach ($children as $child) {
            if ($childLevel === 0 && $child->getData('is_parent_active') === false) {
                continue;
            }
            $child->setLevel($childLevel);
            $child->setIsFirst($counter == 1);
            $child->setIsLast($counter == $childrenCount);
            $child->setPositionClass($itemPositionClassPrefix . $counter);

            $outermostClassCode = '';
            $outermostClass = $menuTree->getOutermostClass();

            if ($childLevel == 0 && $outermostClass) {
                $outermostClassCode = ' class="' . $outermostClass . '" ';
                $currentClass = $child->getClass();

                if (empty($currentClass)) {
                    $child->setClass($outermostClass);
                } else {
                    $child->setClass($currentClass . ' ' . $outermostClass);
                }
            }

            if (is_array($colBrakes) && count($colBrakes) && $colBrakes[$counter]['colbrake']) {
                $html .= '</ul></li><li class="column"><ul>';
            }
            
            $html .= '<li ' . $this->_getRenderedMenuItemAttributes($child) . '>';
            $html .= '<a href="' . $child->getUrl() . '" ' . $outermostClassCode . '><span>' . $this->escapeHtml(
                $child->getName()
                ) . $this->getCustomThumbnail($child) . '</span></a>' . $this->_addSubMenu(
                $child,
                $childLevel,
                $childrenWrapClass,
                $limit
            ) . '</li>';
            $itemPosition++;
            $counter++;
        }

        if (is_array($colBrakes) && count($colBrakes) && $limit) {
            $html = '<li class="column"><ul>' . $html . '</ul></li>';
        }

        return $html;
    }

    public function getCustomThumbnail($childObj)
    {
        if (!($childObj->getIsCategory() && $childObj->getLevel() == 1)) {
            return false;
        }

        $store = $this->_storeManager->getStore();
        $mediaBaseUrl = $store->getBaseUrl(
            \Magento\Framework\UrlInterface::URL_TYPE_MEDIA
        );

        $catNodeArr = explode('-', $childObj->getId());
        $catId = end($catNodeArr);
        
        $collection = $this->_categoryFactory
                ->create()
                ->addAttributeToSelect('cat_thumbnail')
                ->addAttributeToFilter('entity_id',['eq'=>$catId])
                ->setPageSize(1);
        
        if ($collection->getSize() && $collection->getFirstItem()->getCatThumbnail()) {
            $catThumbnailUrl = $mediaBaseUrl
                        . ltrim(\Magento\Catalog\Model\Category\FileInfo::ENTITY_MEDIA_PATH, '/')
                        . '/'
                        . $collection->getFirstItem()->getCatThumbnail();

            return '<span class="cat-thumbnail"><img src="'.$catThumbnailUrl.'"></span>';
        }
    }

}

You should add your own CSS file for styling purpose.

Happy Coding!

How to create your own custom API module in Magento 2.

In Magento2, API plays a vital role to create a shopping app, integrate with CRM (Customer Relationship Management) or ERP (Enterprise Resource Planning) or CMS.

Magento 2 has very good API support. It supports both REST (Representational State Transfer) and SOAP (Simple Object Access Protocol).

But sometimes we need to create our own custom API for doing stuff more easily. Here I will try to show how to create our own custom REST API.

Creating a custom API is relatively easy in Magento 2 than Magento 1. Please follow the steps in the below:

First, create a basic module by creating etc/module.xml, registration.php, composer.json file. Then you have to add REST API feature to this module.

Add webapi.xml file to declare the API URL or API endpoint, service class, and methods.
app/code/Milandev/SimpleAPI/etc/webapi.xml

<?xml version="1.0" ?>
<routes xmlns:xsi="http://www.w3.org/2001/XMLSchema-instance" xsi:noNamespaceSchemaLocation="urn:magento:module:Magento_Webapi:etc/webapi.xsd">
    <route method="GET" url="/V1/milandev-simpleapi/product/:sku">
        <service class="MilanDev\SimpleAPI\Api\ProductManagementInterface" method="getProduct"/>
        <resources>
            <resource ref="anonymous"/>
        </resources>
    </route>
</routes>

Add API class.
app/code/Milandev/SimpleAPI/Model/ProductManagement.php

<?php
namespace MilanDev\SimpleAPI\Model;

class ProductManagement implements \MilanDev\SimpleAPI\Api\ProductManagementInterface
{
    /**
    * {@inheritdoc}
    */
    public function getProduct($sku)
    {
        // add your logic
        return $sku;
    }
}

Add API interface.
app/code/Milandev/SimpleAPI/Api/ProductManagementInterface.php.

<?php
namespace MilanDev\SimpleAPI\Api;

interface ProductManagementInterface
{
    /**
    * GET for product api
    * @param string $sku
    * @return string
    */
    public function getProduct($sku);
}

Add dependency class in the di.xml.
app/code/Milandev/SimpleAPI/etc/di.xml

<?xml version="1.0" ?>
<config xmlns:xsi="http://www.w3.org/2001/XMLSchema-instance" xsi:noNamespaceSchemaLocation="urn:magento:framework:ObjectManager/etc/config.xsd">
    <preference for="MilanDev\SimpleAPI\Api\ProductManagementInterface" type="MilanDev\SimpleAPI\Model\ProductManagement"/>
</config>

Test the API using rest-client by following the URL structure. http://exmaple.com/index.php/rest/V1/milandev-simpleapi/product/sku

This is just a skeleton of a custom REST API module. You need to add your own logic. You can extend this module as you need by adding endpoints, interfaces, classes, methods, and logics. Happy Coding!

How to connect Ionic 4 with PHP and MySQL.

A Few days ago I had to write a hybrid app using the Ionic framework. I choosed PHP and MySQL for backend/API part as I mostly work on the LAMP stack.

Now, I am going to share my experience with Ionic 4 with PHP and MySQL. Here, I will try to write very basic about how actually Ionic 4, PHP and MySQL connect and work together.

First, we need to generate a default demo ionic app, creating a MySQL database and connecting it with PHP. Then follow the steps below:

Create the simple API file. http://exmaple.com/api/api.php
Note: This is just a demo code example to understand the basics. Not to use in Production mode.

<?php
// Headers
header('Access-Control-Allow-Origin: *');
header('Content-Type: application/json');
header('Access-Control-Allow-Methods: GET');
header('Access-Control-Allow-Headers: Access-Control-Allow-Headers,Content-Type,Access-Control-Allow-Methods, Authorization, X-Requested-With');

require 'con.php'; // database connection file

// operations to get data from database

// example data formate
$data = ['name' => 'John Doe', 'email' => 'jon@doe.com'];
// make data json type
echo json_encode($data);

In order to make HTTP requests in an Ionic/Angular environment, we need to make use of the HttpClient and HttpClientModule.

Import the HttpClientModule in src/app/app.module.ts

import { HttpClientModule } from '@angular/common/http';

Add the HttpClientModule to the imports array in src/app/app.module.ts

imports: [
    BrowserModule, 
    HttpClientModule,
    IonicModule.forRoot(), 
    AppRoutingModule
  ],

Import HttpClient in src/app/home/home.page.ts and inject it in the constuctor method.

import { Component } from '@angular/core';
import { HttpClient } from '@angular/common/http';

@Component({
  selector: 'app-home',
  templateUrl: 'home.page.html',
  styleUrls: ['home.page.scss'],
})
export class HomePage {

  constructor(private http: HttpClient) {}

  apiUrl: string = 'http://exmaple.com/api/api.php';

  fetchData() {
    this.http.get(this.apiUrl).subscribe(
      res => {
        console.log(res);
      },
      err => {
        console.log(err);
      }
    );
  }

}

Add the button to src/app/home/home.page.html.

<ion-button (click)="fetchData()">Fetch Data</ion-button>

That’s all from me. If you have something to share please comment below. Happy Coding!